ascort
  • ascort
  • pre67vw Junkie Topic Starter
11 years ago
As I have been given some encouragement to set up a blog about the Ascort restoration work, I thought that I should make a bit of a start ….. but where does one start.

It is probably best to put things into context and provide some background on the car before I start adding information on the actual restoration work.

My Ascort was built in Sydney in 1959 and my recent history gathering leads me to believe that it was probably the first car built after the prototype. (More about that later.) I think that #005 was sort of a pre-production prototype. (A claim that one has to be careful in making on this forum I believe. J )

The car is fitted with plate number #005, but as with many makes the car numbering is a bit of a puzzle. My car has the only known low ID number. Many cars are now minus their plates, but it looks to me that the production cars probably started at #021.

Ascort #005 was originally painted metallic silver with tan interior. The car must have been used to sample different colours, or to give the impression that more cars had been produced than was actually the case. (I have heard a story that the early cars were continually repainted and driven around to be seen in the different colours. Several of the cars do have multiple colours that indicates that this may be true.) In its very early life the car was repainted several times. It was changed to metallic green, burgundy red, red (?) and then back to silver.

UserPostedImageUserPostedImage
These photos MAY be my car when new. The cars in these photos have a few minor features which I have not seen on any other car other than #005.

When #005 was still quite new, the designer Mirek Craney crashed it. (From photos of it being repaired in the Ascort factory, I am guessing that the accident probably happened in 1960). The story that I have been told by the Craney family is that Mirek was run off the road by a truck. The car went through a fence and crashed into a tree, badly damaging the front left corner. Photos indicate that a new left front corner was grafted onto the car at the Ascort production factory in the old tram depot at Tempe, Sydney. Following the repair the car was painted white and then the trail goes cold for about 10 years.

UserPostedImage

In 1973 the car I first saw the car sitting derelict in a front yard in Toowoomba, Queensland with a for sale notice on it. The engine was gone, the interior (other than the front seats) was stripped out, there were holes punched through the fibreglass, the pan was rusted and a pathetic plywood thing had replaced the fibreglass dash. Someone had obviously treated the car very badly and it was a mess. I was a poor college student at the time with no money, but I did remember reading about the Ascort in a magazine and I became fascinated in the car. I visited the owner and got the story on the car, but had no hope in buying it. (It had come from down south some years previously.

About 2 years later I had my first job in central western Queensland, but I had not forgotten the Ascort. It was still for sale and a deal was done. I had ideas of cobbling the car back together in some fashion to get it on the road for minimal expenditure, with no thought of restoration to original condition. The car was taken to my father’s house where it sat out in the weather for 2 years before being towed the 1000km to where I was living.

UserPostedImage
The day I collected the car.

UserPostedImage

Once I had the car with me I started sanding the numerous layers of paint. In some places there was 16 layers of primers and colour coats. It was a very slow and tedious job. The fibreglass repairs started, but it was soon obvious that the repairs on the lower panels were very numerous and were hard to do being so low down. The car also has double panels and repairs were needed inside the double panelling of the wheel arches. (This is a part where I cringe at the memory. I really hate to admit what I did, or more how I did this.) I unbolted the body and with the assistance of about 6 friends, the body was lifted, turned upside down in mid air and was then placed on its roof on a tractor tyre. Repairs were then carried out on the underside of the body and the inner wheel arch panels were cut out, internal repairs made and the inner wheel arch panels were then grafted back into the car.

UserPostedImageUserPostedImage

It was during this time that somebody from the council came to my house and thought that I had a boat under the tarp in the back yard that could be breeding mosquitos. Some friends thought this was a big joke and paid me a silent visit in the middle of the night and put a cardboard outboard motor on the back of the car to continue the boat joke. The body was eventually turned back over and put back onto the rusty pan.

UserPostedImage

The door hinges on the car were badly rusted and broken, but replacement hinges could not be identified so new hinges were manufactured by turning up steel bar, drilling the bar, cutting the bar into small sections and then welding the small sections to the hinge plates. It was a slow process, but the resulting hinges work well and match the originals.


Mark - Owner of 2 under restoration Australian coachbuilt Ascorts.
Sponsor
Log-in to remove these ads
ascort
  • ascort
  • pre67vw Junkie Topic Starter
11 years ago
At this time a magazine called “Cars and Drivers” hit the newsstand. (an excellent Australian magazine that only lasted for 3 issues. In the first issue, it was stated that an article on the Ascort was to be printed and that they were keen to contact any owners. I wrote to the magazine and my letter and photo were published in the second issue and the full Ascort article was published in the third. I was contacted by a reader with pages from an article on the Ascort from a 1959 magazine the contact details of the designer Mirek Craney and another Ascort owner in Melbourne.

I contacted Mirek Craney and was given some most useful information about where parts came from, but there was no response from the other Ascort owner. I decided to construct my new dash, using the poor quality photo in the magazine as a guide. I set up wire, wood and mesh to get the basic shape and then set to work with the plaster of Paris to create the mock up. This was then finished off with primer, and wiping putty to produce a smooth finish. Once I was happy with the result, A mould was taken of my dash. I had just completed the mould when a letter was received from the Melbourne Ascort owner, with a photo of his car’s dash. My dash was not quite right in its shape and I decided that if I was going to the trouble of making a dash, I should do it properly and so I scrapped the work that I had done.

UserPostedImageUserPostedImageUserPostedImage
This work was all scrapped as I was not happy that the profile was correct.

I had a friend going to Melbourne on a holiday, so I sent him off to visit the owner with multiple rolls of film to capture details of the car for me. As this car was a well looked after example (it continues to be one of the most original cars) the photos continue to be a good source of reference material.

A 1965 neat bug was rolled on the local railway crossing by a drunk driver and so I bought the wreck with the intention of using the 65 mechanicals, The pan was swapped and I as much as I hate to admit it now, the original pan was thrown away at the local tip. Today it would have been a fairly easy repair with the readily available pan sections. The original split gearbox was also lost at this time. The ignorance of youth!!! (I am now panning to put a late 50s pan back under the car)

At this time I was transferred back to Toowoomba and as I had little furniture, the Ascort was loaded into the furniture van with the furniture for the return trip.

When I got back to Toowoomba the Ascort took a back seat to the construction of an open wheel hillclimb special and the subsequent competition. It was then a transfer to my current address and the Ascort was parked in the back of the shed for the next 25 years and was untouched while I went flying gliders, doing the family and home thing, and then working in more remote areas of the state. During this time I did continue to collect parts and information for the car and did turn down a few offers. During this time I also learned more about the historic value of the car and became determined to do a proper restoration.

In more recent years Geoff, the person restoring the silver Ascort, contacted me. He had tracked me down from that old Cars and Drivers magazine article as well as about another 10 cars. He also had a good collection of information. As I followed Geoff’s restoration, I realised that the time had come to make a start back on my car. The first thing was to learn as much as I could. Geoff sold his Ascort after completing the restoration and his collection of data went with the car. Geoff requested that I take on the role of maintaining the register, so I set about making contact with the owners, getting copies of photos, talking to gather the stories, snippets of information etc so that I could bring it all together. I learned so much from this. I also made contact with the Craney family and was sent copies of the family’s photos and copies of what documents still existed on the cars. I also made contact with a further 2 owners, taking the known surviving car count to 13. All of the information, and photos was collated and after many hours of work it was put onto a CD for reference. I was now in a position where I could make a reasonable attempt at the car. (A few people on this forum have a copy of the CD – I hope that they have found it interesting).

I the next posts I will get on to the work done in more recent times.


Mark - Owner of 2 under restoration Australian coachbuilt Ascorts.
ascort
  • ascort
  • pre67vw Junkie Topic Starter
11 years ago
There are a number of problems with my Ascort which have been real hurdles to overcome. One big one has been the missing dash, and another is the doors. :cry:

In the previous post I wrote about the first attemp at making a dash about 30 years ago, which I later scrapped. The mould had turned out quite well, but once I had detailed photos of other cars I could see that it was just not right. :bored:

I had often wondered why the dash had been cut out of my car and replaced with a far inferior plywood dash. A few years ago I was given a possible answer to this question. The car that had been the left hand drive prototype finally surfaced, but it had been converted back to right hand drive. I could see in photos how the dash had been replaced (and later learned who carried out the work). The right hand drive section that had been used in the conversion matches the dash section missing from my car. I can only speculate that as my car had become derelict at a quite yound age, that the dash had been taken so that the right hand drive conversion could occur on what was a new and unused body.

UserPostedImage
This is how my dash looked after the plywood had been removed. :omg:

When the silver Ascort was restored a second Ascort was used as a donor car. I was promised the dash from this car, but there ended up being a change of plan and the bones of the old NZ donor car went to South Australia instead. The new owner of the remains eventually took pity on me and had a mould taken from the dash of the old New Zealand donor car's dash. :thumbup:

UserPostedImage

It was an exciting day when I received my new dash section. :d
I had to do a few minor repairs to where the radio had been mounted in the donor car, and I had to repair where chips and flaws in the donor car dash were reflected in the new. I also had to cut the holes for the instruments.

UserPostedImage

The next problem was to work out where to join the dash in, as it is not a bolt in item. :idea: I had to make sure that I incorporated curves and maximize the surface area of the join to achieve strength. There needed to be lots of overlap in the glassing of the joint.

UserPostedImage

Once I was happy with where I would make the join, I did the cutting, with my heart in my mouth. Once the trial fit had been done to my satisfaction the new section was held in place by strips of wood and aluminium, which kept things perfectly aligned. The glass was ground out and the repair carried out between the mounting strips, and the when the resin had cured the strips were removed and the repairs completed on both sides of the panel (lovely job trying to fibreglass under a dashboard! :thumbdn: )

Final sanding and filling then occured. (No the petri wheel was not on the car as the work was done, it was just slipped on for the photos to get the overall effect in the pics.)

UserPostedImage

It was then a prime and quick paint ... just so that I could admire my handiwork. I am happy with how it looks and there are no obvious external signs that the dash is not original. 😎 :beer:

UserPostedImage

The instruments in the dash photo are just for effect and are not the final ones for the car.
Mark - Owner of 2 under restoration Australian coachbuilt Ascorts.
AW
  • AW
  • pre67vw Junkie
11 years ago
This is realy interesting ascort keep up the good work :thumbup:


Andy W
JD
  • JD
  • pre67vw Junkie
11 years ago
Glad you decided to post this. :thumbup:
"John, you need to get a grip and STOP MOANING AT EVERYTHING. ThumbDown "
UserPostedImage
ascort
  • ascort
  • pre67vw Junkie Topic Starter
11 years ago
My conscience has bothered over the 1965 pan being under the Ascort as the purist in me keeps telling me that it should be a late 1950s pan. :unsure:

I am not sure where the original pans were sourced from. I have seen it written that VW stopped supply of the pans which was part of the reason that the Ascort failed, but I am not convinced that this is quite correct. I have copies of correspondence dating to early 1959, when the Ascort project was still young where chassis/mechanical components were being sought from suppliers in Germany without success. I am not sure where the chassis units were eventually sourced from, but discussions with Mrs Craney indicate that this was a major problem. I am not sure that VW ever supplied pans in any numbers.
:?
The prototype Ascort was built in 1958 and the production cars were built in 1959/60. I have only seen the numbers on 2 chassis pans, and these dated to 1958. I have not checked the number on my blue car yet (the body makes access to the chassis number difficult), but I suspect that the pan on it may be even older as the car has a roller throttle pedal (when was the change?)

I have now purchased a late 1957 pan for the #005 car, but it has been fitted with a later tunnel type gearbox and a 1600 engine. The engine will not be used as I plan a TSV Okrasa and I am now on the lookout for a split case gearbox. The new pan is rust free but was involved in a minor accident, The pan had been fitted with a lowered front end which broke at a poor quality weld during the accident, but this is now replaced with a stock front end. As far as I can see and measure all is ok with the pan since I did some work on it. I rebuilt the pedal assembly and have now done the front end work, but still have to re-bush the gearshift and replace the handbrake cable and complete the preparation etc.

One other task that I have done is construct a lifting gantry which will fit over the body to lift it off the pan, supporting the body by the strong double panel wheel arch sections.

UserPostedImage

Ascort #005 was a total basket case when work started and it will never be a "restoration" by the definition of some. It will be more of a reconstruction, but I would still like to keep the car looking authentic as to date there is only one "restored" car, which now has the lowered and narrowed front beam treatment, interior modifications, porsche brakes, porsche engine, sports steering wheel, chrome wide wheels etc.

I think that it is worth the effort of putting a pan under my car which is closer to what it would have had originally.
Mark - Owner of 2 under restoration Australian coachbuilt Ascorts.
ascort
  • ascort
  • pre67vw Junkie Topic Starter
11 years ago
I have a separate post regarding the making of emblems, but I will repeat the basics, just so that it is all together in the blog.

Front emblems are a scarce item and I only know of one that may exist, but the owner has not been willing to cooperate, return emails, provide photos or any other details. A copy of an original item would be the ideal way to go, but without access to an original, I decided to do a re-creation.

I enlarged every old photo that I could find that showed the front emblem and then played with the size until I could get the profile of the front emblem to cover the original mounting holes in a position on the emblem where it would be logical to have the mounting screws.

A balsa wood version of the emblem was created on the photo enlargement, with the advertisement logo used to help with fine detail.
UserPostedImageUserPostedImage

Once the rough balsa version was made a trial fit was done.
UserPostedImageUserPostedImage

After some sealing and shaping with the poly filler and automotive paint putty, I took a silicone mould of the emblem and created a resin version. This was further worked and corrected and then another silicone mould was taken. Resin versions containing aluminium powder then were created. Once I was happy with the results I added mounting screws to a resin emblem then sent it off for chrome plating.
UserPostedImage UserPostedImage

https://www.vintageandclassicreproductions.com/  for it to be replicated in stainless steel. I will own the pattern and I have ordered an initial run of 12 emblems to be made. The cost is high, but so much work went into making the pattern, it seems a shame not to complete the process in metal.

Mark - Owner of 2 under restoration Australian coachbuilt Ascorts.
ascort
  • ascort
  • pre67vw Junkie Topic Starter
11 years ago
While I am on the subject of emblems I think that I may give a little more detail on how the other emblems came about.

The Craney family was kind enough to lend me a set of front letters for an Ascort and also a rear script casting. The rear script was an unfinished sand casting in brass which was flawed, so it had never been finished. I had promised to return the emblems quickly, so I was keen not to break the family's trust as they were critical to the project ( ... and lovely people as I have learned as I got to know them better).

While I had the emblems I took silicone moulds so that I had a good record of the shape.

I will write about the rear script first.

From my silicone mould I made a resin casting, but as the original was a flawed and unfinished sand casting, the resin replicated this state perfectly. I then had to repair the flaw and smooth the resin casting to a polished state so that I could take a second mould which replicated the proper finished state.

UserPostedImage

The resin emblems produced looked good, but despite the addition of aluminium powder the resin was just not solid enough and the emblems were just not solid enough to be satisfactory for use. Another strategy was required.

I used a photograph of the emblem, which I imported into TurboCad software. I scaled the photo until it was 100% in size and then traced the outline, applying best fit curves to end up with a good CAD file of the shape. The file was given to a local business that has a waterjet cutter with a plan to have the emblems cut out of 5mm stainless steel plate. There was a problem though. TurboCad's file replicated a later version of AutoCad .dxf and the TurboCad files were not compatible with the waterjet cutter.

My background is that I was originally qualified as a road design draftsman and so I took the file to work and loaded the file into AutoCad and kept outputting it in earlier and earlier versions until I found one that the waterjet computer could read.

The waterjet cutter did a good job on the stainless and it was then lots of hand finishing required. The plate had to be curved to match the boot of the car, then filed, edges rounded, sanded, and then polished.

Once I was at the final polishing stage the emblem was placed over the original mounting holes in the boot and the emblem was marked for the mounting screws. 1/8 inch holes were drilled as deep as I dared, and then an old drill had the tip ground flat and sharpened at that shape to make a mini end mill so that I could get the screws to bed as deep as possible. After cleaning, 1/8 inch threads were set into the emblem using Devcon.

UserPostedImageUserPostedImage
UserPostedImage
Mark - Owner of 2 under restoration Australian coachbuilt Ascorts.
ascort
  • ascort
  • pre67vw Junkie Topic Starter
11 years ago
The front letters were a similar problem, but far more time consuming.

Again the letters were moulded using silicone and then cast in resin.

Following having the nose emblem chrome plated I realised what an expensive process this could be. The company who did the nose emblem wanted to treat each letter as a separate job and the cost was just too high when one considered that the emblems would still just be resin with a possible limited life span.

UserPostedImage

I looked to see if I could find similar letters on another make of vehicle and also looked on the net for something new, but nothing was found with a similar font. I decided that I could have the individual letters cut and so went looking for the correct font, but without success.

My old draftsman skills then came into play once again. I scanned my resin letters and then replicated their shape in TurboCad and then again went through the process of taking the file to work to get a file that was compatable with the waterjet cutter.

The letters were very slow to hand finish as they have a significant taper which had to be hand filed on all faces. This was a problem due to their size and I had to resort to the use of needle files to get into the tight spots. The letter "S" was by far the worst to do, taking several days of filing to obtain the shape that I wanted.

UserPostedImage

Once the filing was done, the emblems were drilled and mounting pins added and then the final polishing occurred.

UserPostedImage

It was a slow and tedious process, but the final result looks quite good and follows the style of the original letters.
:thumbup:
Mark - Owner of 2 under restoration Australian coachbuilt Ascorts.
ascort
  • ascort
  • pre67vw Junkie Topic Starter
11 years ago
OK I have shown the emblems before so I had better add something new again.

One area of the car in poor condition was the rear seat area. The rear armrest was missing, and the section over the tunnel in the area of the access panel had been broken out and the fibreglass cover was gone. As I have said, I believe that my car was a pre-production build. The access panel over the tunnel did not align with the one on the chassis. (This was corrected on the production cars) and this may have been why the section had been broken out. Other problems included rips in the fibreglass in one seat and at least a hundred holes left from where the trim had been fixed to the body.
:cry:
UserPostedImage

The first task that I undertook was the construction of a new rear armrest. I had the original vinyl from the New Zealand Ascort and this provided me with a profile of the shape that I had to make. (This occurred before I purchased the blue car, so the vinyl was all that I had to work with.

UserPostedImage

I replicated the shape in cardboard and used this pattern as the mould for a new fibreglass armrest. I also hunted down the correct ashtray from ebay. It is a mid 1950s Holden item which was fitted to the rear of the front seat.

Paint was then sanded off the rear seat area and the hundreds of holes were filled. i did not bother to smooth them off to any great extent as I thought that I may help the motor trimmer to be able to detect the original hole locations to see how the original covers had been fitted.

UserPostedImageUserPostedImage

It was then time for the repair. A thin layer of foam was placed over the tunnel to provide a little clearance and it was then covered in a skim of fibreglass reninforced body filler and then shaped smooth. I did this so that I had a good shape to lay the glass onto that would not soak up the resin. This worked well. Once the major repairs were done, I made a matching hatch cover (larger than original) that covered the inspection panel on the pan. (It is still hard to read the chassis no).

On the hatch cover I added a mounting dowel, and a strip of aluminium in the armrest to accept the dowel, so that the rear of the armrest would lock into place. I then cut the hole and added the ashtray.

UserPostedImage:thumbup:

You can still see where I did the fibreglass repairs to the seat as I did not hide this with filler. My reasoning was that it will eventually be covered with vinyl, so it does not matter. It also gives a clear divide between what is original and what is repair.

This is the unrestored rear seat area of my blue car, which gives an indication of how the trim should go.

UserPostedImage
Mark - Owner of 2 under restoration Australian coachbuilt Ascorts.
ascort
  • ascort
  • pre67vw Junkie Topic Starter
11 years ago
Ascorts have twin fuel tanks which were sourced from Ford 105E Anglias. The tanks have 8 imp gallon capacity making a total of 16 gallons of fuel capacity, giving the car over 600 mile (1,000km) range.

The tanks are slightly modified to change the filler position and fuel guage sender unit position. There is only one filler on the left tank, with the right tank fed by cross feed lines at the top and bottom of the tanks. The right tank has the sender unit.

The tanks are located ahead of the rear wheels between the outer skin and the interior panel, held in place by a steel strap which is tensioned by a turnbuckle in the centre. This is a rough picture of where the tanks sit and where the strap and turnbuckle fit.

UserPostedImage

The tanks in my car were fairly straight, but had sections of rust holes and required repair. I decided that as well as the repair, I would give the tanks the POR 15 tank treatment to both seal any missed pinholes and also give a long lasting treatment against further rusting.

The problem with doing the treatment was the tank fittings which had 90 degree bends and so could not be kept free of the sealant. After repairing the rust holes, I removed all of the existing fittings and sweated on brass plates which I had drilled and tapped allowing the new fittings to be removed for the treatment process.

The Por 15 treatment calls for the usual rattle around of bolts and nuts in the tank to loosen any loose rust. The tanks is then cleaned with their marine clean product to remove grease, oil, or wax. The next process is their metalready treatment which is a rust converter, which leaves a slightly acidic etched surface ready for the tank treatment, which is similar to their POR 15 paint product. The final treatment is again poured into the tank and the tank then rolled around in all directions before tipping the excess out.

Once the internal treatment was done, I completed the POR 15 painting of the outside o the tanks, which provides a very tough and durable surface.

UserPostedImage

The straps that held the tank in looked ok at first glance, but closer inspection showed a few failed rivets. I was a little concerned that the rivet failure may be due to corrosion of the rivets, so they were all drilled out and replaced with new stainless steel ones.

UserPostedImage

One problem with the strap on the left side was a jam tin lid washer on the inside of the car that the strap bolt went through. Closer inspection showed that the original smaller washer had been pulled through the fibreglass ripping a hole. I suspect that may have been caused by over tightening of the mounting turnbuckle. This fibreglass repair has yet to be carried out.

Other small jobs that are not worthy of a separate post is the hoodlining bows. The originals were badly rusted and weakened, so I decided that replacement was in order. I looked around for suitable 4mm bar locally, but found nothing, so I decided to send away for lengths of 4mm stainless bar. The stainless seems to work very well as it is stiff enough and sits firmly in place. So far I have made 2 of the 4 bows, but need to do a little work on the front locating holes before the front ones are made.

UserPostedImage

Of course there is any number of other minor bits and pieces that have been rebuilt such as steering locks, headlight dimmers, indicator switches etc etc.

UserPostedImage
Mark - Owner of 2 under restoration Australian coachbuilt Ascorts.
AW
  • AW
  • pre67vw Junkie
11 years ago
Keep it comming ascort this is intresting stuff :beer:


Andy W
ascort
  • ascort
  • pre67vw Junkie Topic Starter
11 years ago

Keep it comming ascort this is intresting stuff :beer:


Andy W

AW wrote:


Thanks for that Andy. I have to keep looking around for my photos. It is a crazy fact that I have been putting a large effort in to collecting and collating information on the Ascort History, but have been very slack in recording the work that I have been doing on my own car.
:cry:

I still have a few things to add yet, but thought that it is best to spread the posts out just a little.

One of the problem areas of my #005 is the doors.
Ascort doors must have always been a bit of a problem as if you look very closely at early photos of the D72 prototype, and early magazine articles where the car is featured, you will not see the windows up and it also has no window winders.

UserPostedImage

(The prototype looks to have had Karmann Ghia door catches, - tell me if I am wrong, while all of the later cars had VW beetle catches and striker plates.)

In interviews, Mirek Craney states that the getting the frameless windows working was a real problem that took some sorting. I also have seen a 1959 list of issues that need attention on the Ascort to improve the design and high on the list was issues with the fit of the windows and draft issues at the bottom of the doors.

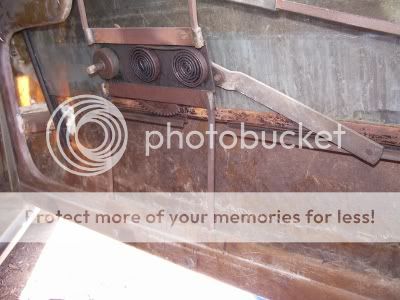
When I purchased my Ascort it was missing its window regulators and the drivers door was missing its window regulator mounting brackets. At least the doors did have the window channels and glass. For the last 30 years I have been looking for the correct winder mechanisms for the doors without success. I have to admit that it is the only significant part that I cannot recognize the origins of.

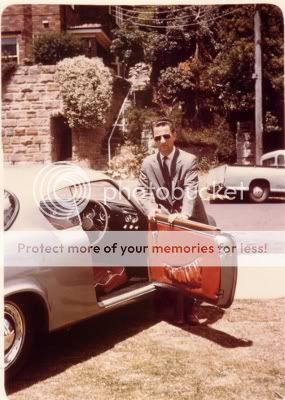
I considered trying to find something else that fitted, but all of the regulators that I tried either just did not fit or put the winder handle in a different location. Some years ago I at least got to see what the original regulators looked like when B. brought his blue drag racing Ascort 2000 km to town for the National VW Drags. (This Ascort was never completed and has never been on the road)

UserPostedImage

In a moment of stupidity I decided that if I cannot find an original, I would just have to make my own. Surely it could not be that hard, I have made my own emblems, my own 1:43 scale models, done the dash etc, so surely I could make these.

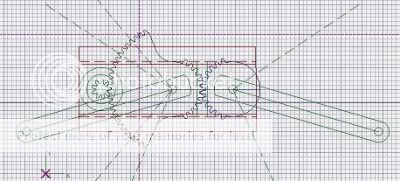
I started by finding some old regulators that I could strip apart for components (the primary gear and mechanism including the square winder shaft). I then went to the car and measured how high the glass needed to lift and lower, where the original position of the winder handle fitted, what the size of the mounting frame needed to be, etc.

I then worked out what the pitch of the primary gear was, how long the arms needed to be, and what arc angle the arms needed to operate through with the mechanism mounted in its original location. This was all drawn in CAD, following the same design principles as the originals. (The arms in this drawing are shorter than they should be).

UserPostedImage

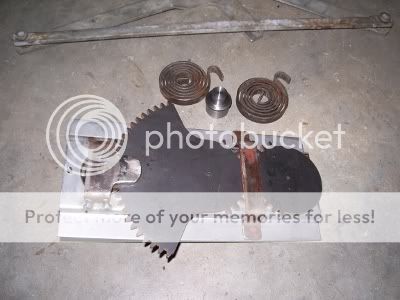
The components were then separated into separate CAD files and taken to my friendly man with the waterjet cutting machine. Once again the compatability problems came up and would not resolve and so the drawing was changed to a .pdf format with a scale provided to ensure that I got full size components. The quadrants, gears and base frame were then cut and the base frame folded to get the required recess depth.

I am only part way through building my regulators as I think that I keep getting chicken and avoiding doing the work on them. The primary gear has a temporary mount with some clecos, the bush for the shaft is mounted, the pivot holes are drilled and reamed and I have now started on the pivot shafts.

I still have a way to go. :unsure:

UserPostedImage

8) :beer:

PS. I forgot to mention that my blue car has different mechanisms and mounts ... but I don't know what they are either at this stage.
Mark - Owner of 2 under restoration Australian coachbuilt Ascorts.
AW
  • AW
  • pre67vw Junkie
11 years ago
Regarding the chrome-plating over here you can have items painted with a special proces that looks like chrome and looks very good. In realaty you could have your car painted in the stuff. I have heard about it for some time but never seen it untill a friend had the bumpers on his 54 caddy done. there are some big bullets on them that rot out and you carnt get them anywere. so fiberglass and filler later to got the profile then this paint was applyed and wow what a look :d . Its not cheep but at least if you need a chrome part you dont have to get it made in a base metal just plastic, filler, wood or what ever and you are there. Keep the info comming :thumbup:.


Andy W
ascort
  • ascort
  • pre67vw Junkie Topic Starter
11 years ago

Regarding the chrome-plating over here you can have items painted with a special proces that looks like chrome and looks very good. In realaty you could have your car painted in the stuff. I have heard about it for some time but never seen it untill a friend had the bumpers on his 54 caddy done. there are some big bullets on them that rot out and you carnt get them anywere. so fiberglass and filler later to got the profile then this paint was applyed and wow what a look :d . Its not cheep but at least if you need a chrome part you dont have to get it made in a base metal just plastic, filler, wood or what ever and you are there. Keep the info comming :thumbup:.


Andy W

AW wrote:


When I talked about having the front emblem "chromed", I was using the term loosely as what you talk about is how the resin cast emblem has been completed. The cost was about $100 Aust.

The finish is great, but the thickness of the finish did take away a tiny bit of detail, but not a problem though.

Now I have taught myself how to replicate things in resin and also fibreglass, the "chrome" finishing process opens up all sorts of possibilities of things that I can do.
Mark - Owner of 2 under restoration Australian coachbuilt Ascorts.
ascort
  • ascort
  • pre67vw Junkie Topic Starter
11 years ago
Tonight I have received a call from the person making the dies for my cast stainless steel front emblems. The dies are finally being made and the castings should be getting produced in a couple of weeks. It has been a long wait, so I am looking forward to them being completed.
:thumbup:


The sunvisors and mirror on #005 were in a sad state. One sunvisor was broken off and missing, the mirror shaft was swinging loosely and a large rectangular mirror had been crudely fitted. The whole assembly was also corroded and rusty.

UserPostedImage
When this photo was taken the large rectangular mirror had been removed.

The corrosion was able to be removed and the metal polished. The reason for the mirror shaft swinging loosely was a missing grub screw. After hours of searching through all the old screws of similar size that a friend and myself could find, we eventually found one that fitted and fixed that problem.
:smile:
The next problem was the mirror. The original was missing and it looked like the mirror fitting had also been modified to suit that old rectangular mirror. After studying photos, I decided that the best solution would be to use a repro mirror for an early bug.
:idea:
I purchased a repro 54 single visor mirror and the mirror shaft was cut and threaded to fit. Maybe a genuine mirror would look better if it had been used, rather than the repro item, but I just hated the thought of cutting a good original.

Repro visors were purchased to finish of the assembly.

UserPostedImage
:?:
HELP - For my records. What were the originals from, or were they just an aftermarket item when new? They were purchased for the Ascorts from Gebrueder Titgemeyer of Germany (along with most of the other Ascort fittings) and were part number K34416 in the 1958 number 17 catalogue.

On the subject of sunvisors. The ones in my blue car were in worse condition and were rusted/corroded and the cast base was broken, (I do have the original mirror, but the shaft is very badly corroded). As the condition was so poor, I have decided to make a replica. I have used stainless steel bar, the base off a 54 repro sunvisor and the cut down mirror off the repro assembly. It still has to be completed and polished and I am also now looking for the acrylic sunvisors.

UserPostedImage

The blue cars original and my part finished copy.

Mark - Owner of 2 under restoration Australian coachbuilt Ascorts.
ascort
  • ascort
  • pre67vw Junkie Topic Starter
11 years ago
One bit of bodywork that has taken a little bit of sorting out is the rear of the car. When I fist purchased #005, the rear bumper was broken in several places, with one section broken right off and the remainder hanging by a thread. There panel (above the tailpipes) was also torn and ripped across most of the width of the car. This area is prone to damage from rocks if the cars do a lot of driving on rough rocky roads,
:cry:

UserPostedImage

When I had the body inverted many years ago, I carried out repairs across the rear panel (see the photo in the earlier post of the mock outboard motor on the back of the car). I did not attempt the rear bumper reapair though. Instead, I removed the section of bumper that was hanging, to ensure that it not fall off and get lost while transporting the car. The paint was also sanded back.

This photo was how the car remained for the next 25 years, with an old stocker 36hp engine in the rear as it was a convenient storage place.
:roll:
UserPostedImage

One problem with the work that I had done was the car should have a rear skirt under the rear panel. I did not know of this until recent years when I began researching the cars more. I created a pattern for the shape using cardboard, and then fibreglassed this shape into place.

The rear bumper was repaired by getting strips of metal which I screwed to the broken segments to get the correct alignment. The sections between the metal strips were then ground out and fibreglassed to hold the assembly. The metal strips were removed and the the fibreglassing was completed. The bumper has a foamed resin core with a fibreglass skin. (Do not believe some of the written stuff in articles which states that the bumper has steel reinforcement). When the repairs were part finished, resin was poured into the split core, to fill the void of the crack. Once the bumper was back in one piece, a similar process was used to bond the bumper back onto the car.

UserPostedImage
:unsure:

There is still a little finishing work required with the glassing to the body on the inside of the bumper in the corner areas. (The grey primer in the other sections is were I have been doing work. It is just a sacrificial coat which I have been using after repairs to show any missed flaws, and keep the UV off the resin.)
Mark - Owner of 2 under restoration Australian coachbuilt Ascorts.
ascort
  • ascort
  • pre67vw Junkie Topic Starter
11 years ago
One of the most time consuming parts of my Ascort work has been the surface work on the fibreglass body. :cry:

As I have said previously, the car had been painted multiple times in its early years, and I would say that the paint jobs were not done with a lot of care. It is obvious that a disc sander had been used and this has been taken right down into the fibreglass in many places which is now causing me lots of grief.
:x

One problem with fibreglass is that it is not much harder than the paint layers and so great care needs to be taken with sanding. Paint stripper is not an option and sand blasting is also not to be used. I have done the paint removal by good old fashioned hard work, using scrapers, an orbital sander for upper layers and then hand sanding the lower layers.

The Ascort was never built with a modern type of gel coat, meaning that the glass fibre is right near the surface in many areas. (When it was builtit was one of the first bodies built in Australia using a glass spray technique, rather than hand laying). Earlier paint jobs had sanded off the resin surface exposing the glass fibres and also broke into minute air bubble holes in glass layers. The problem with this is that it gives problems to subsequent painting.
:sneaky:

Paint thinners soak into the glass fibres and can then release slowly back through thinner based paints, leaving the glass pattern in the paint over time. Surface cracks in the glass WILL come through the paint over time and paint and spray putties can bridge the minute air bubbles, leaving a void under the surface that will show in the surface over time.

UserPostedImage
Disc sander marks


UserPostedImage
Glass fibre on the surface which has soaked primer.


UserPostedImage
Air bubble holes, sander marks etc.


UserPostedImage
Typical surface to be repaired.


I would say that I have filled tens of thousands of minute holes and this is extremely time consuming. I have also ground out and repaired surface cracks, repaired grinder damage etc. Many hundreds of hours have gone into this, but it is rewarding work. I have been working from the rear of the car forward (with the rear bumper area and engine bay still to be finished at the rear, and the doors forward still to be done.

This is how the hip areas are now looking. This was a fairly bad area of the body work which took some time.

UserPostedImage
UserPostedImage

UserPostedImage
This is a view of the rear of #005 looking through the cabin of my blue car. :beer:

Latest work update - I was working on my metal lathe making the bushes for my window regulators when the lathe motor started growling on startup. It has done this before and the motor was taken to be checked out by an electrician and given a clean bill of health. This time the growling noise was followed by a loud bang, darkness and the smell of smoke.
:omg:
I am guessing that the problem may be a little more obvious now! Maybe in the starting capacitor??? Not Happy!!:cry:
Mark - Owner of 2 under restoration Australian coachbuilt Ascorts.
AW
  • AW
  • pre67vw Junkie
11 years ago
Not 100% on this but i think you can spray an apoxy resin on to the glass fiber to give you a bace to build up on. It may be worth getting in touch with a boat repair yard and see if thay have any pointers on it.


Andy W Ps nice work :thumbup:
JD
  • JD
  • pre67vw Junkie
11 years ago
Wow... that looks like a thankless task! :omg:
Came out well for sure.
"John, you need to get a grip and STOP MOANING AT EVERYTHING. ThumbDown "
UserPostedImage